Saturday, August 15, 2009

Cincinnati's "Via Vite" e molto BENE!!

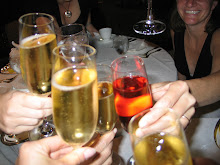
I went for my second dinner at Fountain Square's "Via Vite" restaurant yesterday. Each trip has left me and my husband enormously impressed. The restaurant sits right on the square and the exterior walls are basically all glass, so you can see all the salsa dancing, the crowds, the families, the singles mingling out on the square. You can feel the positive energy out there, and it's like you're in another city altogether -- not somewhere tucked in the mid-west. The restaurant also has outdoor seating, which would be ideal on a perfect summer or fall evening.

Equally as impressive is the interior of the restaurant. The decor in this place is pure class: beautiful wood tables, lovely banquettes covered with a tan and brown fabric, a sparkling bar, gorgeous lighting. It's modern and sleek without being intimidating. The waitstaff is young and seems to be mostly male, and while they are not perfectly polished they are eager to please.


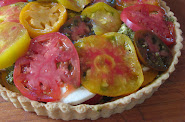
The food: We went to Via Vite yesterday for Cincinnati's Downtown Restaurant Week -- a group of downtown restaurants are offering $35 3-course dinners all week. I chose to start with a warm goat cheese salad with truffle oil and pistachios. That salad could have been my entire meal, not that it was so filling but it was so GOOD. The flavors blended perfectly together and the vinaigrette they used was light and didn't mask the delicate truffle flavor in the oil. They paired it with a Pinot Grigio which was a really great pairing.


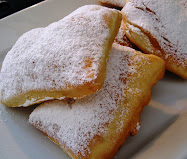
For my main course I had something called gnudi. It basically means "nude" in Italian, and it is the interior of what would be a ravioli or a tortellini (ricotta and spinach) with a light egg coating but no pasta. It was very delicate, served in a buttery sauce (which may have been a bit too heavy) and with shaved truffles. I LOVE those truffles, they just make my toes curl. They paired this dish with an Italian red wine...I can't remember which but it was good. And their glasses of wine are VERY generous.


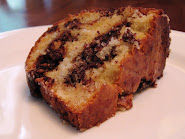
For dessert, I had the espresso creme brulee. It was simple, but the texture was perfect and it was a bit lighter than most creme brulees I've had. Nothing to write home about, but nothing to be disappointed in either.


I feel like Fountain Square has been reborn, with the evening activities all summer and the new restaurants that flank its sides. Via Vite was packed yesterday evening, and I suspect it will remain packed as long as it keeps serving up such wonderful Italian food.

Monday, July 27, 2009

Daring Baker's Challenge for July: Marshmallow Cookies


The July Daring Bakers' challenge was hosted by Nicole at Sweet Tooth. She chose Chocolate Covered Marshmallow Cookies and Milan Cookies from pastry chef Gale Gand of the Food Network.


Remember Mallomars? Those yummy cookies with a chocolate covered marshmallow on top? Ahh, the joys of youth....Since I hadn't had one of these cookies since I was probably 10, I was so suprised when we were asked to create our own version for this month's Daring Baker's Challenge!


We were allowed to make a variation as far as filling goes, so I filled mine with a dollop of raspberry jam, very simple. The hardest part of this challenge was probably the marshmallow and getting it onto the cookie without a sticky disaster on your hands. But with a pastry bag I was able to manage it pretty well, and it was very exciting to make my own marshmallow after thinking about it for years but putting it off!


These were really excellent and gobbled up in no time, but I think that in the future I will buy them, they were a little bit time consuming for something that is not necessarily better homemade!


Mallows(Chocolate Covered Marshmallow Cookies)

Recipe courtesy Gale Gand, from Food Network website


Prep Time: 10 min

Inactive Prep Time: 5 min

Cook Time: 10 min

Serves: about 2 dozen cookies


• 3 cups (375grams/13.23oz) all purpose flour

• 1/2 cup (112.5grams/3.97oz) white sugar

• 1/2 teaspoon salt• 3/4 teaspoon baking powder

• 3/8 teaspoon baking soda

• 1/2 teaspoon ground cinnamon

• 12 tablespoons (170grams/ 6 oz) unsalted butter

• 3 eggs, whisked together


• Homemade marshmallows, recipe follows

• Chocolate glaze, recipe follows


1. In a mixer with the paddle attachment, blend the dry ingredients.

2. On low speed, add the butter and mix until sandy.

3. Add the eggs and mix until combine.

4. Form the dough into a disk, wrap with clingfilm or parchment and refrigerate at least 1 hour and up to 3 days.

5. When ready to bake, grease a cookie sheet or line it with parchment paper or a silicon mat.

6. Preheat the oven to 375 degrees F.

7. Roll out the dough to 1/8-inch thickness, on a lightly floured surface. Use a 1 to 1 1/2 inches cookie cutter to cut out small rounds of dough.

8. Transfer to the prepared pan and bake for 10 minutes or until light golden brown. Let cool to room temperature.

9. Pipe a “kiss” of marshmallow onto each cookie. Let set at room temperature for 2 hours.

10. Line a cookie sheet with parchment or silicon mat.

11. One at a time, gently drop the marshmallow-topped cookies into the hot chocolate glaze.

12. Lift out with a fork and let excess chocolate drip back into the bowl.

13. Place on the prepared pan and let set at room temperature until the coating is firm, about 1 to 2 hours.


Note: if you don’t want to make your own marshmallows, you can cut a large marshmallow in half and place on the cookie base. Heat in a preheated 350-degree oven to slump the marshmallow slightly, it will expand and brown a little. Let cool, then proceed with the chocolate dipping.


Homemade marshmallows:

• 1/4 cup water

• 1/4 cup light corn syrup

• 3/4 cup (168.76 grams/5.95oz) sugar

• 1 tablespoon powdered gelatin

• 2 tablespoons cold water

• 2 egg whites , room temperature

• 1/4 teaspoon pure vanilla extract

1. In a saucepan, combine the water, corn syrup, and sugar, bring to a boil until “soft-ball” stage, or 235 degrees on a candy thermometer.

2. Sprinkle the gelatin over the cold water and let dissolve.

3. Remove the syrup from the heat, add the gelatin, and mix.

4. Whip the whites until soft peaks form and pour the syrup into the whites.

5. Add the vanilla and continue whipping until stiff.

6. Transfer to a pastry bag.


Chocolate glaze:

• 12 ounces semisweet chocolate•

2 ounces cocoa butter or vegetable oil


1. Melt the 2 ingredients together in the top of a double boiler or a bowl set over barely simmering water.

Sunday, June 28, 2009

Daring Bakers Challenge for June: Almond Tart!


Bakewell Tart…er…pudding


Hostess: Jasmine of Confessions of a Cardamom Addict
Co-hostess: Annemarie of Ambrosia and Nectar


The June Daring Bakers' challenge was hosted by Jasmine of Confessions of a Cardamom Addict and Annemarie of Ambrosia and Nectar. They chose a Traditional (UK) Bakewell Tart... er... pudding that was inspired by a rich baking history dating back to the 1800's in England.

Bakewell tarts…er…puddings combine a number of dessert elements but still let you show off your area’s seasonal fruits.

Like many regional dishes there’s no “one way” to make a Bakewell Tart…er…Pudding, but most of today’s versions fall within one of two types. The first is the “pudding” where a layer of jam is covered by an almondy pastry cream and baked in puff pastry. The second is the “tart” where a rich shortcrust pastry holds jam and an almondy sponge cake-like filling.

The version we’re daring you to make is a combination of the two: a sweet almond-flavoured shortcrust pastry, frangipane and jam.


Makes one 23cm (9” tart)
Prep time: less than 10 minutes (plus time for the individual elements)
Resting time: 15 minutes
Baking time: 30 minutes
Equipment needed: 23cm (9”) tart pan or pie tin (preferably with ridged edges), rolling pin


One quantity sweet shortcrust pastry (recipe follows) Bench flour 250ml (1cup (8 US fl. oz)) jam or curd, warmed for spreadability
One quantity frangipane (recipe follows)
One handful blanched, flaked almonds


Assembling the tart
Place the chilled dough disc on a lightly floured surface. If it's overly cold, you will need to let it become acclimatised for about 15 minutes before you roll it out. Flour the rolling pin and roll the pastry to 5mm (1/4”) thickness, by rolling in one direction only (start from the centre and roll away from you), and turning the disc a quarter turn after each roll. When the pastry is to the desired size and thickness, transfer it to the tart pan, press in and trim the excess dough. Patch any holes, fissures or tears with trimmed bits. Chill in the freezer for 15 minutes.


Preheat oven to 200C/400F.


Remove shell from freezer, spread as even a layer as you can of jam onto the pastry base. Top with frangipane, spreading to cover the entire surface of the tart. Smooth the top and pop into the oven for 30 minutes. Five minutes before the tart is done, the top will be poofy and brownish. Remove from oven and strew flaked almonds on top and return to the heat for the last five minutes of baking.


The finished tart will have a golden crust and the frangipane will be tanned, poofy and a bit spongy-looking. Remove from the oven and cool on the counter. Serve warm, with crème fraîche, whipped cream or custard sauce if you wish. When you slice into the tart, the almond paste will be firm, but slightly squidgy and the crust should be crisp but not tough.


Jasmine’s notes:
• If you cannot have nuts, you can try substituting Victoria sponge for the frangipane. It's a pretty popular popular cake, so you shouldn't have any troubles finding one in one of your cookbooks or through a Google search. That said, our dear Natalie at Gluten a Go Go has sourced some recipes and linked to them in the related alt.db thread.
• You can use whichever jam you wish, but if you choose something with a lot of seeds, such as raspberry or blackberry, you should sieve them out.
• The jam quantity can be anywhere from 60ml (1/4 cup) to 250ml (1cup), depending upon how “damp” and strongly flavoured your preserves are. I made it with the lesser quantity of home made strawberry jam, while Annemarie made it with the greater quantity of cherry jam; we both had fabulous results. If in doubt, just split the difference and spread 150ml (2/3cup) on the crust.


Annemarie’s notes:
• The excess shortcrust can be rolled out and cut into cookie-shapes (heck, it’s pretty darned close to a shortbread dough).


Sweet shortcrust pastry


Prep time: 15-20 minutes
Resting time: 30 minutes (minimum)
Equipment needed: bowls, box grater, cling film


225g (8oz) all purpose flour
30g (1oz) sugar
2.5ml (½ tsp) salt
110g (4oz) unsalted butter, cold (frozen is better)
2 (2) egg yolks
2.5ml (½ tsp) almond extract (optional)
15-30ml (1-2 Tbsp) cold water


Sift together flour, sugar and salt. Grate butter into the flour mixture, using the large hole-side of a box grater. Using your finger tips only, and working very quickly, rub the fat into the flour until the mixture resembles bread crumbs. Set aside.


Lightly beat the egg yolks with the almond extract (if using) and quickly mix into the flour mixture. Keep mixing while dribbling in the water, only adding enough to form a cohesive and slightly sticky dough.


Form the dough into a disc, wrap in cling and refrigerate for at least 30 minutes


Jasmine’s notes:
• I make this using vanilla salt and vanilla sugar.
• If you wish, you can substitute the seeds of one vanilla bean, one teaspoon of vanilla paste or one teaspoon of vanilla extract for the almond extract


Frangipane


Prep time: 10-15 minutes
Equipment needed: bowls, hand mixer, rubber spatula


125g (4.5oz) unsalted butter, softened
125g (4.5oz) icing sugar
3 (3) eggs
2.5ml (½ tsp) almond extract
125g (4.5oz) ground almonds
30g (1oz) all purpose flour


Cream butter and sugar together for about a minute or until the mixture is primrose in colour and very fluffy. Scrape down the side of the bowl and add the eggs, one at a time, beating well after each addition. The batter may appear to curdle. In the words of Douglas Adams: Don’t panic. Really. It’ll be fine. After all three are in, pour in the almond extract and mix for about another 30 seconds and scrape down the sides again. With the beaters on, spoon in the ground nuts and the flour. Mix well. The mixture will be soft, keep its slightly curdled look (mostly from the almonds) and retain its pallid yellow colour.


Annemarie’s notes:
• Add another five minutes or more if you're grinding your own almonds or if you're mixing by hand (Heaven help you).

Wednesday, May 27, 2009

Daring Baker's Challenge for May: Apple Streudel


Or shall we say, "Ahhhpfell schtruuuudelll". My little girl is going to a German immersion school next year, much to my linguistic chagrin (why can't the French school be as good as the German school? Why? Why?). So it is high time I learn how to cook SOMETHING German, and hey, why not start with a "schtruuudell"...just my luck that it was chosen as this month's Daring Baker's challenge by Courtney of Coco Cooks Linda of make life sweeter.

When I first heard that this was the challenge, I must admit that I made a frown face...there's really nothing about streudel that entices me. I'm not a fan, I can't stand rolling things until they are paper thin, and I thought "what in the world am I going to do with a streudel that is as long as my arm?" But then I bucked up and thought "I could be the Queen Mum of Fairview German Language School with my homemade streudel, I'll be "the streudel mom"" , and off I went.

I will have to say that the rolling process was one of the worst experiences of my culinary life. I think I developed biceps on my biceps rolling this dough. I may need to visit a chiropractor. I understand now why people just buy their streudel rather than make it. Yeesh. But once it was filled (a messy, messy process) and rolled up, I slit the top and added some pearl sugar and "voila"....I got myself some streudel! It was yummy too, great with vanilla ice cream. But this makes a huuuuge load of streudel. Be streudel-ready, or have a streudel party.

One thing about streudel...eat it hot, fresh out of the oven. Otherwise your streudel will be soggy and messy....

Guten Appetit!

The May Daring Bakers’ challenge was hosted by Linda of make life sweeter! and Courtney of Coco Cooks. They chose Apple Strudel from the recipe book Kaffeehaus: Exquisite Desserts from the Classic Cafés of Vienna, Budapest and Prague by Rick Rodgers.


Preparation timeTotal: 2 hours 15 minutes – 3 hours 30 minutes
15-20 min to make dough

30-90 min to let dough rest/to prepare the filling

20-30 min to roll out and stretch dough

10 min to fill and roll dough

30 min to bake30 min to cool


Apple strudelfrom “Kaffeehaus – Exquisite Desserts from the Classic Cafés of Vienna, Budapest and Prague” by Rick Rodgers


2 tablespoons (30 ml) golden rum

3 tablespoons (45 ml) raisins

1/4 teaspoon ground cinnamon

1/3 cup plus 1 tablespoon (80 g) sugar1/2 cup (1 stick / 115 g) unsalted butter, melted, divided

1 1/2 cups (350 ml) fresh bread crumbs

strudel dough (recipe below)

1/2 cup (120 ml, about 60 g) coarsely chopped walnuts

2 pounds (900 g) tart cooking apples, peeled, cored and cut into ¼ inch-thick slices (use apples that hold their shape during baking)


1. Mix the rum and raisins in a bowl. Mix the cinnamon and sugar in another bowl.
2. Heat 3 tablespoons of the butter in a large skillet over medium-high. Add the breadcrumbs and cook whilst stirring until golden and toasted. This will take about 3 minutes. Let it cool completely.
3. Put the rack in the upper third of the oven and preheat the oven to 400°F (200°C). Line a large baking sheet with baking paper (parchment paper). Make the strudel dough as described below. Spread about 3 tablespoons of the remaining melted butter over the dough using your hands (a bristle brush could tear the dough, you could use a special feather pastry brush instead of your hands). Sprinkle the buttered dough with the bread crumbs. Spread the walnuts about 3 inches (8 cm) from the short edge of the dough in a 6-inch-(15cm)-wide strip. Mix the apples with the raisins (including the rum), and the cinnamon sugar. Spread the mixture over the walnuts.
4. Fold the short end of the dough onto the filling. Lift the tablecloth at the short end of the dough so that the strudel rolls onto itself. Transfer the strudel to the prepared baking sheet by lifting it. Curve it into a horseshoe to fit. Tuck the ends under the strudel. Brush the top with the remaining melted butter.
5. Bake the strudel for about 30 minutes or until it is deep golden brown. Cool for at least 30 minutes before slicing. Use a serrated knife and serve either warm or at room temperature. It is best on the day it is baked.


Strudel doughfrom “Kaffeehaus – Exquisite Desserts from the Classic Cafés of Vienna, Budapest and Prague” by Rick Rodgers


1 1/3 cups (200 g) unbleached flour

1/8 teaspoon salt

7 tablespoons (105 ml) water, plus more if needed

2 tablespoons (30 ml) vegetable oil, plus additional for coating the dough

1/2 teaspoon cider vinegar


1. Combine the flour and salt in a stand-mixer fitted with the paddle attachment. Mix the water, oil and vinegar in a measuring cup. Add the water/oil mixture to the flour with the mixer on low speed. You will get a soft dough. Make sure it is not too dry, add a little more water if necessary.Take the dough out of the mixer. Change to the dough hook. Put the dough ball back in the mixer. Let the dough knead on medium until you get a soft dough ball with a somewhat rough surface.
2. Take the dough out of the mixer and continue kneading by hand on an unfloured work surface. Knead for about 2 minutes. Pick up the dough and throw it down hard onto your working surface occasionally.Shape the dough into a ball and transfer it to a plate. Oil the top of the dough ball lightly. Cover the ball tightly with plastic wrap. Allow to stand for 30-90 minutes (longer is better).
3. It would be best if you have a work area that you can walk around on all sides like a 36 inch (90 cm) round table or a work surface of 23 x 38 inches (60 x 100 cm). Cover your working area with table cloth, dust it with flour and rub it into the fabric. Put your dough ball in the middle and roll it out as much as you can.Pick the dough up by holding it by an edge. This way the weight of the dough and gravity can help stretching it as it hangs. Using the back of your hands to gently stretch and pull the dough. You can use your forearms to support it.


4. The dough will become too large to hold. Put it on your work surface. Leave the thicker edge of the dough to hang over the edge of the table. Place your hands underneath the dough and stretch and pull the dough thinner using the backs of your hands. Stretch and pull the dough until it's about 2 feet (60 cm) wide and 3 feet (90 cm) long, it will be tissue-thin by this time. Cut away the thick dough around the edges with scissors. The dough is now ready to be filled.


Tips-

Ingredients are cheap so we would recommend making a double batch of the dough, that way you can practice the pulling and stretching of the dough with the first batch and if it doesn't come out like it should you can use the second batch to give it another try;- The tablecloth can be cotton or polyster;- Before pulling and stretching the dough, remove your jewelry from hands and wrists, and wear short-sleeves;- To make it easier to pull the dough, you can use your hip to secure the dough against the edge of the table;- Few small holes in the dough is not a problem as the dough will be rolled, making (most of) the holes invisible.

Friday, February 27, 2009

Daring Baker's Challenge for February: Flourless Chocolate "Valentino" Cake

When I saw that this month's challenge was a flourless chocolate cake, I danced a jig in my soul...these are easy cakes to make, they come out great and the challenge allowed us to make an ice cream of our choice. I haven't made ice cream in ages so that was an added "bonus".


The February 2009 challenge is hosted by Wendy of WMPE's blog and Dharm of Dad ~ Baker & Chef. They chose a Chocolate Valentino cake by Chef Wan; a Vanilla Ice Cream recipe from Dharm and a Vanilla Ice Cream recipe from Wendy as the challenge. I did mint ice cream instead.

The first thing that hit me about the recipe was its minimalist ingredients...I have made flourless chocolate cakes, and my favorite one has 1/2 cup of sugar in it. I assume this is to cut the "bitter" from the bittersweet / semisweet chocolate. And so, not wanting to mess with the recipe, I made it exactly as printed.


The cake was very easy to make (melt chocolate and butter, beat egg whites, voila) and it puffed up really nice. As it was baking, I made mint ice cream from Pierre Herme's Chocolate Desserts cookbook, which was easy to make and delicious but incorporated waaaaaay too many mint leaves. I don't like to chew my ice cream! But at least my dessert had fiber.


So the judgment hour was upon me as I brought my cakes and my ice cream to a friend's house for dinner. The first bite was definitely an 'oh wow this is good' bite for all of us. But I noticed that after about 3 bites, all the forks kind of went down and coffee drinking and chatting continued. Why were we not devouring this dessert? It was chocolate, it was cake, it was VALRHONA and cost me a bundle to make! Eat, dammit!! EAT! I know at that moment I wasn't even involved in the conversation, I was just waiting for someone to eat. But they seemed done. Why?

I think, in all honesty, that the chocolate (56% cacao) was too bittersweet, and that the recipe needed that 1/2 cup of sugar. This clarifies why the other flourless chocolate cakes I've made included a bit of sugar and tasted better in the end. I do think that this cake was good, but that the sugar would have made it much more "devourable".

In all, this is a good recipe but not the one I will use for flourless chocolate cake in the future. Or maybe I'll try it again, but add some sugar and see how it turns out! As for the ice cream, it was delicious...but Pierre calls for one heck of a lot of chopped mint!

Bon appetit!

Chocolate Valentino
Preparation Time: 20 minutes
16 ounces (1 pound) (454 grams) of semisweet chocolate, roughly chopped
½ cup (1 stick) plus 2 tablespoons (146 grams total) of unsalted butter
5 large eggs separated

1. Put chocolate and butter in a heatproof bowl and set over a pan of simmering water (the bottom of the bowl should not touch the water) and melt, stirring often.

2. While your chocolate butter mixture is cooling. Butter your pan and line with a parchment circle then butter the parchment.

3. Separate the egg yolks from the egg whites and put into two medium/large bowls.

4. Whip the egg whites in a medium/large grease free bowl until stiff peaks are formed (do not over-whip or the cake will be dry).

5. With the same beater beat the egg yolks together.

6. Add the egg yolks to the cooled chocolate.

7. Fold in 1/3 of the egg whites into the chocolate mixture and follow with remaining 2/3rds. Fold until no white remains without deflating the batter.

8. Pour batter into prepared pan, the batter should fill the pan 3/4 of the way full, and bake at 375F/190C

9. Bake for 25 minutes until an instant read thermometer reads 140F/60C.


Wednesday, February 4, 2009

Pierre Hermé's "Classic Hot Chocolate"


I feel like I've been a prisoner in my own home for the last week. Snow, snow, snow. You can only have so many snow days before you start to lose it a little. So I search for something to life my spirits. And nothing goes with snow quite like a good hot chocolate....which becomes the highlight of my snow days. Typically I serve my small children Swiss Miss. They love it, me..not so much. But it's warm and tastes somewhat like chocolate, so I just do it. But I had my last cup two days ago, there's no going back after Pierre's hot chocolate....

So yesterday while the snow was literally piling up outside, the kids were in bed, my husband was on the road trying to get home, I decided to make myself some real European hot chocolate. Anyone who's been to a café in Paris and ordered a "chocolat viennois" knows what I'm talking about...their hot chocolate is so rich, so decadent, you feel it from your head to your toes. The tastes almost come in layers, with a great punch of chocolate at the end. So I pulled out Pierre Hermé's "Chocolate Desserts" book and made his very simple "Classic Hot Chocolate".
One sip made me want to break out one of those Madeleines I made a few weeks ago. This sip took me right back to a little café on the Ile St. Louis in Paris, where they make the best and richest hot chocolate you'd ever drink. I never knew their secret, but it's one of those "must visits" when I'm in Paris, summer or winter. Turns out, their secret is just good, real chocolate. Not powder, but real dark chocolate. I never knew...it's as easy as that. Pierre's recipe proves it.

I might make another tonight...It's full of anti-oxidants, so they say!


Classic Hot Chocolate

(serves 2...I made 1/2 the recipe for one serving)

2 cups whole milk (I used skim, but I know whole would have been soooo much more sinful)
1/4 cup water
1/4 cup sugar (I found it a bit too sweet. Next time I will omit the sugar and add it at the end if necessary)
4 ounces melted bittersweet chocolate (NOT CHIPS)....a good chocolate like Valrhona would be best ( I didn't pre-melt mine, I just chopped it and let it melt in the milk)

Bring the milk, water and sugar to a boil in a medium saucepan, stirring until the sugar dissolves. Add the chocolate and stir with a whisk until it combines. Pull the saucepan from the heat and whip for about one minute with an immersion blender or in a regular blender. Serve immediately in large cups, or you can refrigerate it for two days, covered tightly.

Friday, January 23, 2009

Madeleines

In Marcel Proust's Remembrance of Things Past (A la recherche du temps perdu) he uses the taste of a madeleine dipped in a cup of tea as a catalyst to involuntary memory in his main character. As a man, Swann takes a bite of a madeleine dipped into his cup of tea, and immediately he is thrown back to his grandmother's kitchen where he recalls the same flavors and scents as a young boy. If you've seen the movie "Ratatouille", they do the same thing when the food critic takes a bite of food at Remy's restaurant and is immediately transported to his childhood kitchen and mother's cooking. We've all had that experience, where we taste, smell or hear something that makes us recall something from our past.

I think Proust had a great idea in choosing the madeleine for this purpose. After living in Europe and having madeleines rather frequently, I find that every time I have another one, I am immediately swept back to the streets of Paris, madeleine in hand. Or at the breakfast table in Tours, having madeleines and coffee. Madeleines were a big part of my European life, shall we say. I have been dying to make madeleines at home for years, yes years. I used to buy them at Trader Joe's, so I didn't have to make them, but TJ's discontinued them (foolish error!)...so I have been left to my own devices. I scoured Dorie Greenspan's Baking cookbook (a MUST HAVE by the way) and found a plethora of madeleine recipes. I chose the basic one, but I will try the others in the future, because this is one easy recipe.

I made the madeleines for a New Year's Day brunch, and they were devoured in no time. Unfortunately I didn't get the characteristic hump on the back of the madeleines like I would have liked. I understand the trick to that is having cold batter. Mine was in the refrigerator overnight, so I'm not sure where I went wrong, but practice makes perfect! In any case, these are a keeper, and they will wow your friends!!


Traditional Madeleines

Source: Dorie Greenspan, Baking: From My Home to Yours

2/3 cup all-purpose flour
¾ teaspoon baking powder
Pinch of salt
½ cup sugar
Grated zest of 1 lemon
2 large eggs, at room temperature
2 teaspoons pure vanilla extract
¾ stick (6 tablespoons) unsalted butter, melted and cooled
Confectioners’ sugar, for dusting


Whisk together the flour, baking powder and salt.

Working in a mixer bowl, or in a large bowl, rub the sugar and lemon zest together with your fingertips until the sugar is moist and fragrant. Add the eggs to the bowl. Working with the whisk attachment, or with a hand mixer, beat the eggs and sugar together on medium-high speed until pale, thick and light, 2 to 3 minutes. Beat in the vanilla.

With a rubber spatula, very gently fold in the dry ingredients, followed by the melted butter. Press a piece of plastic wrap against the surface of the batter and refrigerate it for at least 3 hours, or for up to 2 days. This long chill period will help the batter form the hump that is characteristic of madeleines.

(For convenience, you can spoon the batter into the madeleine molds, cover and refrigerate, then bake the cookies directly from the fridge; see below for instructions on prepping the pans.)
GETTING READY TO BAKE:

Center a rack in the oven and preheat the oven to 400 degrees F. Butter 12 full-size madeleine molds, or up to 36 mini madeleine molds, dust the insides with flour and tap out the excess. Or, if you have a nonstick pan (or pans), give it a light coating of vegetable cooking spray. If you have a silicone pan, no prep is needed. Place the pan(s) on a baking sheet.


Spoon the batter into the molds, filling each one almost to the top. Don’t worry about spreading the batter evenly, the oven’s heat will take care of that. Bake large madeleines for 11 to 13 minutes, and minis for 8 to 10 minutes, or until they are golden and the tops spring back when touched. Remove the pan(s) from the oven and release the madeleines from the molds by rapping the edge of the pan against the counter. Gently pry any recalcitrant madeleines from the pan using your fingers or a butter knife. Transfer the cookies to a rack to cool to just warm or to room temperature.


If you are making minis and have more batter, bake the next batch(es), making certain that you cool, then properly prepare the pan(s) before baking.


Just before serving, dust the madeleines with confectioners’ sugar.


Makes 12 large or 36 mini cookies

Serving: Serve the cookies when they are only slightly warm or when they reach room temperature, with tea or espresso.

Storing: Although the batter can be kept in the refrigerator for up to 2 days, the madeleines should be eaten soon after they are made. You can keep them overnight in a sealed container, but they really are better on day 1. If you must store them, wrap them airtight and freeze them; they’ll keep for up to 2 months.

Tuesday, January 20, 2009

Inaugural Carrot Cake!


I'm off to an Inauguration Party tonight chez some good friends. I've been asked to create an "Obama cake". I was stumped, I'm not a great decorator and had no clue how to make an "Obama cake".

Thank goodness for the Internet...where you can find things like "Obama's logo stencil" for free! I downloaded, made this wonderful carrot cake from Epicurious.com (the BEST CARROT CAKE EVER), and frosted it with gobs of cream cheese frosting.

To make the design, I cut the stencil out, and used cake "glitter" which I purchased at Michael's. Et voila....an Obama-teau!