Tuesday, October 30, 2007

Salted Butter Caramel Ice Cream


Ever since I purchased my second-hand Cuisinart Ice Cream machine for $10 the other week, I have been perusing various ice cream recipes looking for one to hit the spot. Those that keep coming back to me are David Lebovitz's...probably because he wrote an entire book devoted just to ice cream, The Perfect Scoop, and probably because he has the best ice cream recipes around.

So, I had made a bunch of salted butter caramel macarons (post to come soon), and I had so much caramel and so many egg yolks left over I thought I would make an attempt at the salted butter caramel ice cream from the book. Keep in mind, until now the only place I had ever eaten this flavor of ice cream was in Paris, at the famed Berthillon. And boooooooy is it good. Sinful. Decadent. Impossibly good.

So, off I went to my mini ice cream maker and my ingredients, and I actually created salted butter caramel ice cream from scratch. Not only that, but it was EASY. Bien sûr, it may not have been as good as Berthillon's (I think I went too heavy on the salt in my hard caramel), but it was delish nevertheless. I served it with homemade deep dish apple pie (post to come soon) and folks swooned. The mixture of sweet and salty is just perfect. My two year old licked his bowl clean. But two year olds do that, so maybe it wasn't the compliment that I took it as. I'll take what I can get.

My advice: 1) Don't eat this ice cream immediately. The pieces of crunchy caramel have to soften up before you dig in, otherwise you'll be digging them out of your teeth all night. Wait overnight and watch how they soften and ooze. It's yuuuummmy.
2) Be patient while making your caramel. Don't stir too much. Just relax.
3) Use good course sea salt (sel de mer). Not table salt. Trader Joe's sells course sea salt for rock bottom prices.

Sunday, October 28, 2007

Trader Joe's Frozen Chocolate Croissants


Ahhhh, le pain au chocolat. Once you've had a "chocolate croissant" or "pain au chocolat" in France, it's so hard to find a good one elsewhere. You immediately become a croissant snob. Le snobisme du croissant. What's wrong with foreign croissants? Too often, they are either bready, or dry, or use too little chocolate or the wrong kind of chocolate, I could go on. I've been more than disappointed with the pain au chocolat I've found in the U.S. The absolute worst are the ones with chocolate sauce or caramel sauce drizzled on top. Blasphemy!


So, I was in the Trader Joe's frozen food section the other day, gazing lovingly upon their vast array of frozen treats. It seems as though every week they have something new, and very often it is French. (Their French apple tart is fantastique, by the way.) So last time I saw something I had never seen before. There between the puff pastry and the pie crust (both are also new from what I know) was a tiny little box of joy...chocolate croissants. Boy, did they look good on the box. But I know how that goes...nothing ever turns out as good as it does on the box.


So I bought them, took them out of the freezer last night before bed (they have to rise for 9 hours from frozen) and we had them this morning with coffee. Let me tell you....no longer do I have to make the trip to my favorite French café for my "pain au chocolat"...(Greenup Café in Covington, Kentucky if you must know)...these will do JUST FINE. They are light, they are a touch crisp on the outside, the chocolate is high quality and there are TWO BARS of chocolate! They are buttery and divine. I highly recommend these for anyone who has a craving for an authentic chocolate croissant, you won't be disappointed.


Oh, and when in France, please ask for a "Pain au chocolat" (literally "bread with chocolate"), not a "chocolate croissant". The latter is an anglophone invention and doesn't work in French!

Saturday, October 27, 2007

Williams-Sonoma's Toasted Pumpkin Seeds


We made our annual Jack-O-Lanterns today, and that means a table-full of sloppy pumpkin innards to contend with. But nothing is left to chance with those folks at Williams-Sonoma, they are right on top of our pumpkin-carving-day needs: there was a recipe for toasted pumpkin seeds included in their pumpkin carving kit (beware, the saws break very easily...).

So after cleaning all the goop off the seeds, I quickly stirred together this concoction. I can't say it's the best thing in the world, I might prefer simple salted pumpkin seeds, but the house does smell like a dream.


Ingredients:
2 cups fresh pumpkin seeds (pulp removed)
1 Tb. unsalted butter
2 Tb. brown sugar
2 Tb. honey
1/4 tsp. cinnamon
1/4 tsp. nutmeg
1/8 tsp. cloves
1/8 tsp. freshly ground black pepper (I skipped this)
Salt to taste (I used corse sea salt)

Preheat oven to 350.

Use a dry, non-stick saute pan that is oven-proof. Over medium heat, toast the pumpkin seeds stirring often to avoid burning, until lightly golden (5 minutes or so).

Add the butter and cook until seeds are evently coated in melted butter.

Add the brown sugar and all other ingredients, mix well.

Spread the seeds in an even layer in the pan. Bake in the oven until the entire mixture is coated and the seeds are crunchy, about 15 minutes.

Thursday, October 25, 2007

Martha Stewart's Chocolate Chip Cookies


A rainy day and two four year old girls running around my house sent me straight to the kitchen to a) get away and b) create a diversion for the kids that didn't involve listening to Barney or the Wiggles. God love 'em.

So, out came the tried and true Martha Stewart Chocolate Chip Cookie recipe. With two giggling girls sitting on stools around the KitchenAid mixer, we beat and blended and tasted raw (yes raw) cookie dough to our heart's content.

Trouble with 4 year olds, they want to touch everything...from the dough you are trying to ball up and bake, to the hot oven, to the hot pans, to the hot cookies, you get the drill. There was a lot of "No, don't touch! Hot!" going on in my kitchen today. And then they don't quite understand that you can't grab a scorching hot cookie straight from the oven and scarf it down immediately. Let's just say their 4 year old cookie patience was being pushed to the limits with all these regulations.

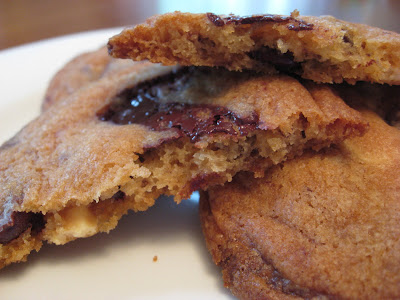
Anyway, back to the recipe. Let me tell you that these cookies are excellent. The Martha Stewart chocolate chip cookie recipe creates the perfect consistency for a chocolate chip cookie: crisp on the outside and chewy on the inside, with nice soft and melty chips. I used 1/2 white chocolate and 1/2 semi-sweet this time, because I was low on semi-sweet. They are also excellent with chopped walnuts.

Her original recipe calls for a 18 minute cooking time. I found mine were just about done at 13 minutes, though. You don't want to over-bake these cookies, or they will be too crisp.


Ingredients:
2 cups all-purpose flour
1 teaspoon baking soda
1 teaspoon salt
2 sticks (1 cup) unsalted butter, room temperature
1 cup granulated sugar
1/2 cup packed dark-brown sugar
2 teaspoons pure vanilla extract
1 large whole egg, plus 1 large egg white
2 oz. semisweet chocolate chunks (about 2 cups)


Preheat the oven to 375F, with racks in the upper and lower thirds. Line two large baking sheets with parchment paper; set aside.

In a medium bowl, whisk together the flour, baking soda, and salt; set aside. In the bowl of an electric mixer fitted with the paddle attachment, beat the butter and both sugars on medium speed until light and fluffy, about 3 minutes, scraping down the sides of the bowl as needed.
Add the vanilla, whole egg, and egg white. Beat on low speed until well combined, scraping down the sides of the bowl as needed, about 1 minute. Add flour mixture in two batches; mix until just combined. Mix in chocolate.

Shape 2 heaping tablespoons of dough at a time into balls and place about 1 1/2 inches apart on prepared baking sheets. Bake, rotating sheets halfway through, until cookies are golden brown, about 18 minutes ( I did 13). Transfer parchment and cookies to a wire rack to cool completely. Cookies can be kept in an airtight container at room temperature for up to 4 days.

Monday, October 22, 2007

Mmmmmm....French Macarons!


Anyone who has tried the beloved French macaron while visiting Paris knows why these little cookies are such big deals these days. Bite into one Pierre Herme or Laduree macaron and your foodie life has suddently taken a turn for the better: you experience a crisp shell that cracks as you bite into it, giving way to a light-as-air, moist interior. It is a sandwich cookie resembling a burger of all things, and the filling in the center is always creamy, often adding a very unexpected kick of flavor to your macaron.

The problem with macarons is finding them in the U.S., where most people think of a "macaroon" with its coconut-y chewiness. No, French macarons are not at all the same. They are made with egg whites, confectioners sugar and almond flour.

The difficulty in making your own macarons comes down to the mixing. It has to be done just perfectly....if you mix your batter too much or too little you won't get the perfect result (shiny dome, no cracks, little frilly feet). A rule of thumb in making French macarons: once you see the batter "flow like magma", or the tip of batter disappear when you pull out the rubber spatula, you know you are ready to pipe.

To be successful in this endeavor, you need to have the right equipment: a stand mixer, a food processor, parchment paper or silpats and a pastry bag with a 1/4 inch wide round tip.

For Chocolate Macarons, I tried a number of recipes but find my greatest success with David Lebovitz's recipe. With his, you get the perfect frilly feet, the crisp shell, and the interior is the perfect consistency. I have never had a failure with this recipe, which is not the case with so many others I've tried. I have tweaked it a bit, by lowering his temperature and cooking time (this is probably a difference between my oven and his, I think my oven cooks hotter than it should). Good luck, and if it doesn't work the first time, try try again!

French Chocolate Macarons:
1/2 cup almond flour (or you can grind your own almonds very fine)
1 cup confectioners sugar
3 Tb. dutch process cocoa powder
2 egg whites at room temperature (let them sit for a few hours up to one day)
5 Tb. granulated sugar

Preheat oven to 350 (the original recipe calls for 375, but 350 works better for me).
Line cookie sheets with parchment paper or silpats.

In a food processor, process the almond flour, confectioners sugar and cocoa powder until combined. Set aside.

Beat egg whites until they begin to froth. Add the granulated sugar gradually, and beat until stiff peaks but not dry. It is important that you don't over beat or under beat your egg whites.

Remove bowl from stand mixer and add the dry ingredients. Using a rubber spatula, fold the ingredients together, the egg whites will fall and that is ok. Mix until the batter "flows like magma" or a peak dissolves into the batter.

Fill pastry bag with batter and pipe 1 inch rounds on your silpat or parchment paper (some people draw circles on their parchment, but it's pretty easy to pipe out the circles without). I also like to sift some cocoa powder on top of my macarons, it makes them look beautiful.

Let the macarons sit for about 20 minutes before putting them into the oven. Only bake one pan at a time, in the center of your oven. I bake mine for 12 minutes (the original recipe calls for much more). Remove from oven and let sit until cool, then peel from parchment or silpat. Once cool, the shells can be filled immediately or frozen in an airtight container and filled later. I don't like to freeze filled macarons, but I know you can.
What you are looking for: a rounded and shiny dome with no cracks, little frilly feet (not too big) around the bottom and a slightly chewy interior.


Ganache:
1/2 cup heavy cream
2 tsp. light corn syrup
4 oz. bittersweet chocolate finely chopped (I use Valrhona 56%)
1 Tb. butter, cut into small pieces

To fill the cookies, you can either use a pastry bag or an icing spatula. I've done both and there's really no difference, but the pastry bag is less messy. Just fill one shell and put another shell on top. The macarons should be left to sit at least one day and up to 3. They get softer as they sit, and the result is a Laduree-worthy macaron!

Bon appetit!


Wednesday, October 17, 2007

Dark Chocolate Cut Out Cookies


There is a baby shower in the family this weekend, and I look upon this as an opportunity to bake something. So I offered to be in charge of "all things sweet". I've been cooking for a week! Cookies, macarons, and tomorrow cupcakes.

One of the cutest creations I came up with were these dark chocolate bear cut outs. Not only do they look good, but there is a LOT of chocolate flavor to these cookies. To me, there is nothing worse than taking a bite of something that is supposed to be chocolate and finding it flat and tasteless. I find that I keep eating it, looking for that chocolate fix...but it never comes.

Not with these teddy bears, let me tell you! They pack a punch (as well as plenty of cocoa powder and chopped dark chocolate). Be careful, though, the dough is VERY fragile (and extremely delicious raw...but who eats raw dough??). It takes a long time to stiffen up in the refrigerator, and even then it gets sticky fast when you are working with it.

The recipe says you should bake at 325, which I did. I ended up with very tender cookies, which do break easily (I hope they last until Saturday!). I happened to bake one cookie at 350 by accident (it was on another pan...) and it turned out much sturdier and crisp. I think I'll go that route next time!

Dark Chocolate Cut Outs
2 Tb. unsweetened cocoa powder
3 oz. bittersweet chocolate coarsely chopped
1 1/2 cups all-purpose flour
3/4 tsp. baking powder
1/4 tsp. salt
1/2 cup unsalted butter at room temperature
3/4 cup granulated sugar
1 egg
1 tsp. vanilla extract
1 tsp. instant coffee powder dissolved in 1 Tb. hot water

In a food processor, combine the cocoa, chocolate and 1/4 cup of flour and process until the chocolate is a fine powder. Add the remaining flour, baking powder and salt. Pulse to blend. In a bowl (or stand mixer), cream together the butter and granulated sugar until light and fluffy. Beat in the egg, vanilla and coffee. Stir in the flour mixture, mixing well. Shape dough into a disk and wrap in plastic wrap. Chill until firm.

Preheat oven to 325 (or 350 for crisper cookies). Divide dough into quarters, and roll out on a lightly floured surface. Cut out shapes and transfer to ungreased (or silpat lined) baking sheets.

Bake for 10 - 12 minutes or until firm. Transfer to racks to cool.

Friday, October 12, 2007

Dark Chocolate Cupcakes with Vanilla Buttercream


We're heading to a going away party for neighbors tonight, and there will be adults and children in attendance. As usual, I volunteered to bring dessert. What do you bring for a crowd that ranges in age from 2 - 40? The dessert for all ages: CUPCAKES!

Cupcakes have been all the rage in this country ever since Sprinkles in LA delivered their fantasy cakes to Paris Hilton in prison. Now it seems that everyone wants their very own Paris-in-prison cupcake. Amazing...

Anyway...as can be noted by the incredible success of cupcake bakeries like Sprinkles, the cupcakes of the 21st century are fun, gorgeous and really delicious. They don't have to be the cupcake from a box of 1975 anymore. (Although really, there's nothing wrong with those either...). Think about it...who can resist a cupcake? They're cute! They couldn't have as many calories as a slice of cake, no way!

So, I settled on making cupcakes. And after a little research I found a great looking recipe for dark chocolate cupcakes from PBS's fab show: America's Test Kitchen. I figured if they tested it, it's gotta work. I wanted dark cupcakes with rich flavor for the adults, and because I wanted to do a Halloween theme for the kids. I tinted the icing a light orange and used Halloween sprinkles.
These cupcakes are a dream...I've already inhaled two. They remind me of Suzy-Qs, but they have a shelf life of 2 - 3 days rather than 2 - 3 years. They are rich and dark and very moist, and the buttercream recipe is incredibly light.

My only frustration with the recipe is that it makes 12 cupcakes, and I needed 24. They say this recipe does not double well, and if you want 24 cakes you should make it twice. Not one to question the Test Kitchen, I complied. I was in the kitchen longer than I wanted to be, but the results are phenomenal.

Dark Chocolate Cupcakes from America's Test Kitchen:
Makes 12 cupcakes:
8 Tb unsalted butter, cut into 4 pieces
2 oz. bittersweet chocolate, chopped
1/2 cup Dutch processed cocoa
3/4 cup unbleached all-purpose flour
1/2 teaspoon baking soda
3/4 teaspoon baking powder
2 large eggs
3/4 cup sugar
1 teaspoon vanilla extract
1/2 teaspoon table salt
1/2 cup sour cream

Place oven rack in middle position, preheat oven to 350 degrees F. Line standard-sized muffin pan with cupcake liners.

Combine butter, chocolate, and coca powder in meadium heatproof bowl. Set over a saucepan of simmering water. Heat mixture until butter and chocolate are completely melted and whisk until smooth and combined. Set aside to cool until just warm to the touch.

Whisk flour, baking soda and baking powder in small bowl to combine.

Whisk eggs in second medium bowl (or standing mixer) to combine, add sugar, vanilla and salt and whisk until fully incorporated. (Here I use a standing mixer and the paddle attachment). Add cooled chocolate mixture and whisk until combined. Sift about one-third of the flour mixture over the chocolate mixture and whisk until combined. Whisk in sour cream until combined. Then sift remaining flour mixture over and whisk until homogenous and thick.
Divide batter evenly among muffin pan cups. Bake 18 - 20 minutes.

Cool cupcakes in muffin pan on wire rack until cool enough to handle, about 15 minutes. Carefully lift each cupcake from the muffin pan and set on a wire rack to cool completely, about 30 minutes. Frost with icing when the cupcakes are at room temperature.

Vanilla Bean Buttercream from America's Test Kitchen


This recipe is for 12 cupcakes or a one layer cake. It can be doubled for 24 cupcakes or a two-layer cake.
If using a hand-held electric mixer, be sure to increase your mixing time (at least 50 percent).

10 Tb unsalted butter, softened
1/2 vanilla bean, halved lengthwise (if you don't have a vanilla bean, increase the vanilla extract to 1 1/2 teaspoons)
1 1/4 cups confectioners' sugar
pinch of table salt
1/2 teaspoon vanilla extract
1 Tb heavy cream

In standing mixer fitted with whisk attachment, beat butter at medium-high speed until smooth, about 20 seconds. Using a paring knife, scrape the seeds from the vanilla bean into the butter and beat mixture at medium-high speed to combine, about 15 seconds. Add confectioners' sugar and salt. Beat at medium-low speed until most of the sugar is moistened, about 45 seconds. Scrape down bowl and beat at medium speed until mixture is fully combined, about 15 seconds. Scrape bowl, add vanilla and heavy cream, and beat at medium speed until incorporated, about 10 seconds. Increase speed to medium-high and beat until light and fluffy, about 4 minutes, scraping down the bowl once or twice.

Tuesday, October 9, 2007

Ratatouille (and I don't mean the cartoon)


Yes, I do eat vegetables! But I will be the first to admit that I am baaaad at getting my veggies. I would much rather have a piece of dark Valrhona chocolate than a carrot, any day. But I know I must...so what tastier way than a ratatouille?


I learned how to make this vegetable stew-ish creation when living with a family in France. We ate a whole lot of ratatouille in the fall and winter months. It's warm, it has tons of good veggies in it, and it really tastes good. You could put it over couscous or pasta, or just eat it as-is with a nice chunk of crusty bread. I served mine with salmon the other day. Deee lissh!


Ratatouille (Rat-a-too-eee!)
1/4 cup olive oil
1 large onion coursely chopped
2 Tb minced garlic
1 tsp. fresh thyme chopped
1/2 tsp. fresh rosemary copped
8 fresh basil leaves chopped
1 red bell pepper, cut into 1/2 inch dice
1 green bell pepper, cut into 1/2 inch dice
1/2 pound zucchini, cut into 1 inch dice (usually one zucchini = 1/2 pound)
1/2 pound eggplant, peeled and cut into 1 inch dice
1 pound tomatoes peeled, seeded and diced (or 1 1/2 cups canned diced tomatoes without juice)
Salt and pepper to taste


Using some of your 1/4 cup olive oil, film a 10 inch saute pan and place over medium heat. Cook the onion until translucent, add the garlic, thyme, rosemary and basil and stir 2-3 more minutes. Remove the mixture from the heat and place it in a large mixing bowl.


Heat the saute pan again, and film with a bit more olive oil. Satue the red and green peppers over high heat until wilted but crisp. Remove and add the peppers to the onion.


Heat the saute pan again and add a bit more oil. Saute the eggplant over medium-high heat, about 1-2 minutes. Add to the other vegetables.


Pour the tomatoes on top of the vegetable mixture and stir with a wooden spoon. Season with salt and pepper to taste.


Place the vegetable mixture in a large pot and simmer for about 15 minutes, stirring occasionally (you don't want the vegetables to burn or stick to the bottom of the pan).


When finished, remove from the heat. You can serve immediately, or refrigerate it and rewarm it just before serving. The ratatouille usually tastes best on the second day.

Sunday, October 7, 2007

Homemade Ice Cream!


I went to a neighbor's yard sale today and she was selling an almost-never-used Cuisinart ice cream machine. It was like kismet, the law of attraction, good karma coming my way. For $10 I was the proud owner of the same Cuisinart ice cream machine I was checking out at Williams-Sonoma just the day before. If you imagine it, it will come.

So then I got home and had my machine but didn't have a clue what to do with it. So I googled "David Lebovitz Ice Cream" and found a bunch of his recipes from his new ice cream recipe book, The Perfect Scoop. I decided to start simply, so I did the vanilla bean recipe. It was so easy, it couldn't have been easier. Now this ice cream isn't as creamy as the custard based ice creams will be (hopefully) when I make those. This is more of a Breyer's ice cream: milk, cream, sugar, vanilla beans...voila. It's really good, better than many store bought ice creams because it is so flavorful with real vanilla, and there is no goopy chemical added for extra fluff.
If you have a maker, try this out. If you don't, go to a yard sale and get one for a song!


Ingredients
2 cups heavy cream
1 cup whole milk or half-and-half
¾ cup sugar
1 vanilla bean, split lengthwise
¾ tsp. vanilla extract

Steps
Pour 1 cup of the cream into a medium saucepan and add the sugar. Scrape the seeds from the vanilla pod into the saucepan and add the pod to the pot. Warm over medium heat, stirring, until the sugar is dissolved.

Remove from heat and add the remaining cream, the half-and-half, and the vanilla extract.
Chill mixture thoroughly in the refrigerator, for at least eight hours or overnight.

When ready to churn, remove the vanilla pod (reserve the bean for another use), then freeze in your ice-cream maker according to the manufacturer’s instructions.

This content is from the book The Perfect Scoop by David Lebovitz.

Saturday, October 6, 2007

Profiteroles...Ice Cream Puffs of Joy


One of my very favorite desserts to order in a Parisian restaurant is profiteroles. Many foreign tourists don't order profiteroles, because they aren't so sure what they are. Strange name, sounds like a contagious disease: "She has the profiteroles, only 2 months to live."

What is a profiterole? A cream puff "choux" filled with ice cream and covered with rich chocolate sauce. It is pure heaven, and fulfills many dessert needs at once: pastry, ice cream and chocolate.

Making your own Pate a choux is not as hard as it seems. If you have a food processor and a pastry bag, you're in luck.

Pate a Choux:
1 cup milk
4 Tbs butter (1/2 stick, unsalted)
1/8 tsp salt
1 tsp sugar
1 cup flour (unsifted)
5 large eggs

Preheat the oven to 375F.

Put the milk, butter, salt and sugar in the saucepan, place over high heat. Stir, melting the butter and bring to a boil. Remove the pan from the heat and immediately add all the flour, stirring rapidly with a wooden spoon. You want to moisten all the flour and make the paste come together.

Set the pan over medium heat, continue to stir rapidly. The dough will soon come off the sides of the pan and become a soft lump. Continue stirring a bit longer, drying out the dough a bit, for a minute or so. You will see a whitish film forming on the bottom of the saucepan, and you are done.

Remove the dough from the heat and scrape it into the bowl of the food processor. Cool it for a few minutes so that the eggs won't cook when you add them. Break four of the eggs in a measuring cup, reserving the fifth egg.

Pulse the dough in the food processor, then add the eggs one at a time. Process each egg for a few seconds, adding each egg separately. Process for a few moments after each addition.

Stop and check the consistency of the dough. You want soft paste. If it is too stiff, lightly beat the fifth egg and add a bit of it to the dough, processing for a moment. You can use the rest of this egg for your egg wash.

Line the cookie sheet with parchment or a silpat.

Fit a plain tip on the pastry bag and fill the bag with the pate a choux. Pipe small puffs, using around one tablespoon of dough for small choux. For larger ones, use 2 - 3 tablespoons. Leave about 1 1/2 inches between each puff.

Using a beaten egg as your egg wash, brush the tops of each puff, smoothing down any point that is visible in the puff.

Place the sheet in the oven and bake for about 25 minutes, or 35 - 40 minutes for larger choux. The puffs will be deep golden brown all over when they are done.

When finished, turn off the heat and open the oven door a couple of inches and allow the puffs to dry out for about 30 minutes in the oven. Cool completely before using or storing (they can be stored for a few days in a plastic container, or frozen for several weeks in airtight containers.

Chocolate Sauce:
1 cup half and half or cream
6 oz. good quality bittersweet chocolate, chopped into small pieces (I use Valrhona)
1/4 cup strong espresso
Vanilla extract

In a small saucepan heat the half and half/cream to simmer. Add the espresso to the hot cream, and pour over the broken up chocolate in a heat proof bowl. Add one teaspoon vanilla. Store covered in the refrigerator.

To assemble your profiteroles:
Cut the tops off of the choux.
Place a small scoop of ice cream in the choux (I prefer vanilla bean)
Put the top on the choux
Cover with warm chocolate sauce
Sprinkle with powdered sugar

Thursday, October 4, 2007

Oh la la...Creme Anglaise!


Sometimes one of the best part of dessert is the bed of scrumptiousness it is sitting on....raspberry coulis, chocolate sauce, freshly whipped cream, or the coup de grace: creme anglaise. Not too sweet, not too heavy, just a little "oomph" of flavor for your dessert plate.

But you usually only see creme anglaise in restaurants. At home, we tend to plop our cake or tart right on a blank canvas, and it looks a little naked just sitting there without a background. Creme anglaise does a great job dressing up your dessert. Think of it as pants for your cake.

It is easy to make and it goes with just about everything. I like it best with dark, chocolatey desserts. I'm using some tomorrow night with a dark chocolate cake for a friend's birthday.
The recipe makes a lot (2 cups), and you can store it in the refrigerator for about 3 days.


Creme Anglaise:
1 whole vanilla bean
2 cups half and half
4 egg yolks
1/4 cup sugar
1/2 teaspoon grated lemon zest

Using a sharp knife, split the vanilla bean in half lengthwise.
In a 2 quart saucepan over medium heat, combine the half and half with the split vanilla bean. Bring to a boil, remove from the heat and set aside.

Remove the vanilla bean and scrape the seeds out into the half and half.

Meanwhile, whisk the egg yolks, sugar and lemon zest in a medium sized stainless steel bowl. (I use my Kitchenaid mixer for this part). Whisk until the mixture is pale yellow and doubled in volume.

When the egg mixture is done, dribble in some of the hot half and half while whisking slowly. Once about 1/4 cup of the hot liquid has been incorporated, whisk the rest in more rapidly.

Pour the custard back into the saucepan and cook over low to medium heat, stirring constantly with a wooden spoon, until the custard thickens. DO NOT boil, or the eggs will cook.

Remove the custard from the heat and strain through a fine sieve. Refrigerate for up to several days before serving.

Serve very cold.